Solidigm Assistant
AI-powered product support
Properly Install Windows® 10 on Your Storage Disk With UEFI Enabled In The System BIOS And The GPT (GUID Partition Table) Created
Summary
We recommend performing Windows® 10 installations enabling UEFI with a GUID Partition Table (GPT).
Some features may not be available if you use the Master Boot Record (MBR) style partition table.
Configure a system to install an OS to a GUID Partition Table (GPT) partition
| Note |
|
- Connect a USB Windows® 10 UEFI install key
- Boot the system into the BIOS (for example, using "F2" or the "Delete" key)
- Locate the "Boot Options Menu"
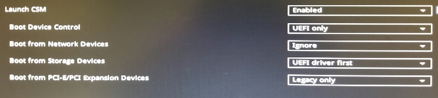
- Set Launch CSM to "Enabled." If CSM is set to "Disabled," you can skip to step 8 below
- Set Boot Device Control to "UEFI Only"
- Set Boot from Storage Devices to UEFI driver first
- Save your changes and restart the system.
- Reenter the BIOS (for example, using "F2" or the "Delete" key).
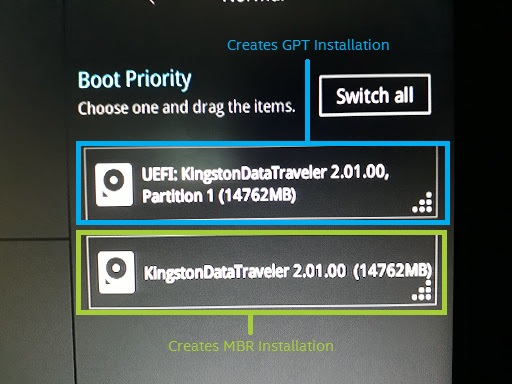
- Confirm in the Boot Priority List that the "USB UEFI OS Boot" option is at the top of the list.
- Reboot the system and install Windows* as usual.
Confirm that Windows* is installed to a GPT partition.
- Boot into Windows*
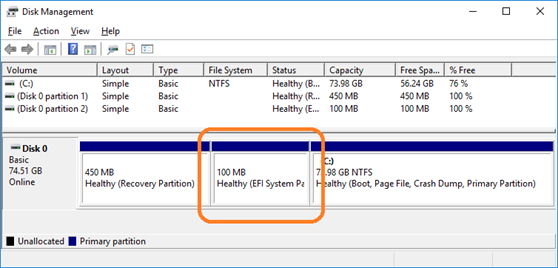
- Open Disk Manager (For Windows® 10, press the "Windows*" key and the "X" key simultaneously, then click "Disk Manager"). You see three partitions including the EFI System Partition.
3. Right-click the disk shown as (Disk x, Basic, Capacity, Online) on the left
4. Select "Properties"
5. Click the "Volumes" tab. Here you can confirm the "Partition style".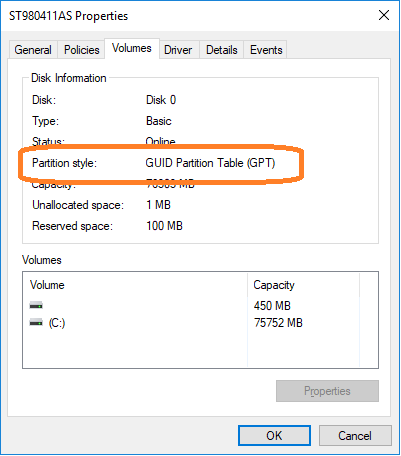
Questions? Check out our Community Forum for help.
Issues? Contact Solidigm™ Customer Support:
[Chinese] [English] [German] [Japanese] [Korean]
Success